So you’ve got yourself a Mustang Ecoboost, the latest four-cylinder Mustang. Now, while that may sound like sacrilege, the good news is that it’s a hardy turbo four-cylinder similar to the one in the Ford Focus RS. This means that with the traction control turned off, it keeps the traditional rwd format of engine in the front and burnouts in the back. All the while it achieves better average fuel economy than similar cars in its class thanks to acronyms like “hwy mpg”, cruise control, and an optional 10-speed automatic transmission. There are lots of fun ways to juice things up, from intake and exhaust systems to tunes and high-performance turbochargers. That last one is what we’ll be tackling here.
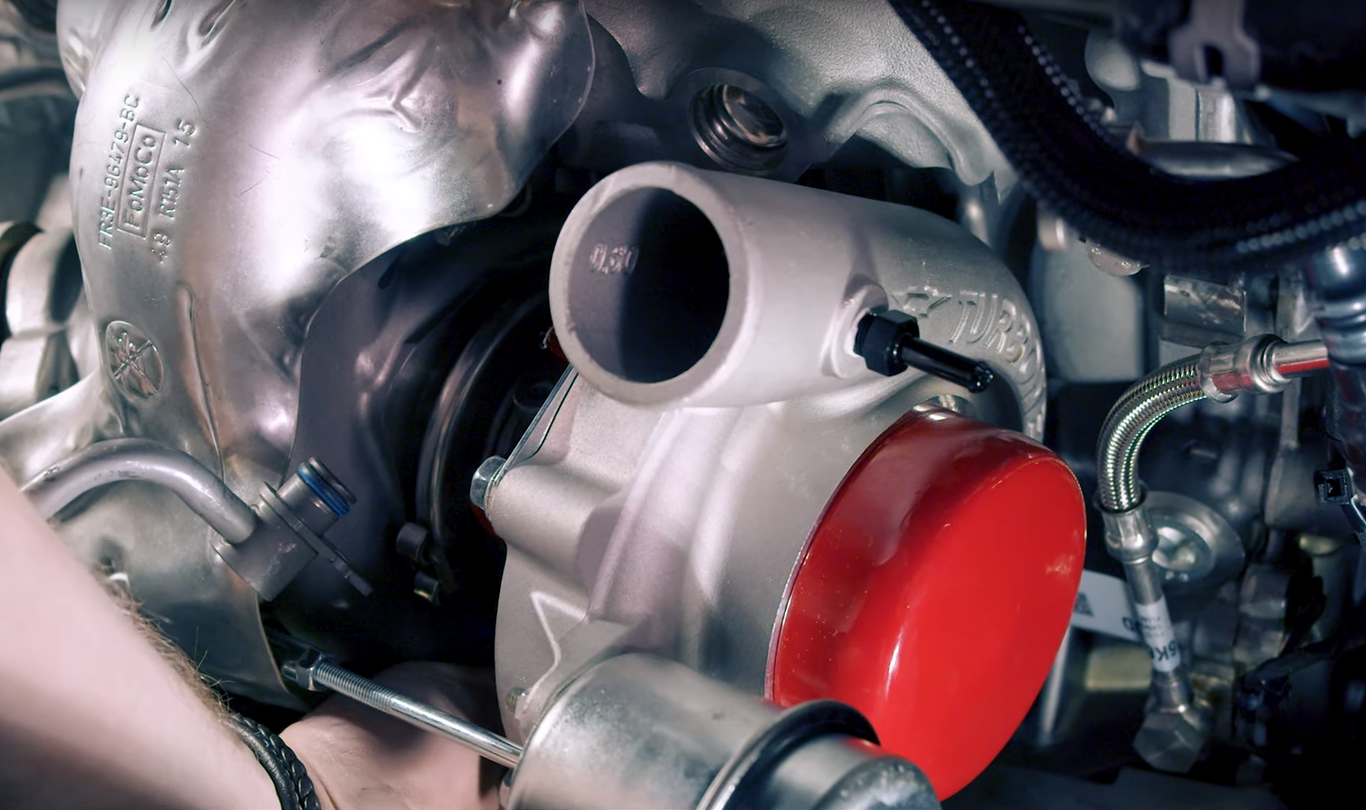
Turbonetics makes a Precision Turbo kit for the 2.3L four-cylinder engine found in the 2015 and newer Ford Mustang Ecoboost. With supporting modifications, Turbonetics claims it offers even more power at the crank than the V8-engine Mustang GT, capable of delivering over 500 horsepower while still being hundreds of pounds lighter than a similarly equipped 5.0 model. The best part: it’s relatively simple to install, since there’s so much room in the S550 Mustang’s engine bay!
Necessary Tools
- 1/2″ and 3/8″ ratchets
- 8mm, 10mm, 12mm, 13mm, and 15mm sockets
- 3″ and 6″ extensions
- Reverse Torx 8mm socket
- Miscellaneous needle-nose pliers
- Multiple 10mm wrenches
- Crescent wrench
- Flathead screwdrivers
- Mirror
- Torque wrench
Installation Guide
Step 1: Disconnect the Battery with a 10mm socket.
Step 2: Disconnect the PCV at the quick disconnect point. Push down on the PCV, and slide over the lock with a flathead screwdriver.
Step 3: Disconnect the blowoff valve recirculation hose. This is easily done with a set of channel locks or a strong grip on some pliers to remove the spring clamp.
Step 4: Disconnect the air intake tube. Firstly, loosen the hose clamp on the coupler, and pull the air intake out, leaving the coupler on the turbo. Then, loosen the hose clamp on the coupler at the air airbox, and the whole intake tube will pop right out.
Step 5. Disconnect the intercooler piping. Start by loosening the clamps on the turbo side, and then remove the piping from the coupler; then, do the same thing on the intercooler end of the pipe. To completely remove the pipe, you will need to remove the blowoff valve vacuum line, which should just slide right off.
Step 6: Disconnect the wastegate actuator lines. These are all air-only lines that are spring clamped onto their stems, so don’t worry about any mess. The first of these lines is on the face of the wastegate; the second is on the inlet housing of the turbo. The final one is deeper in the engine bay: it is a five-inch long plastic tube that connects to another hose that connects to the turbo. In this case it is easier to disconnect the line from the rubber hose, and disconnect the hose itself when it is fully off.
Step 7: Remove the intercooler coupler from the turbo by loosening the clamp holding it to the turbo inlet.
Step 8: A single 8mm bolt holds the oil feed line onto the turbo. An o-ring holds the tube on; disconnect it, and be careful not to spill too much oil.
Step 9: Detach the 8mm bolt securing the coolant lines to the turbo. Have a large drain pan ready! Close to half of your coolant can be drained from these lines while they are detached. (If you would like to skip the drain pan, you can instead drain the coolant from your vehicle before starting the job.)
Step 10: The oil drain line is under the turbo, and not visible from most easy working points; use a 10mm socket and a small ratchet to loosen and remove the bolt holding the oil drain line onto the turbo. Then, remove the hose from the turbo just like the other fluid lines.
Step 11: Unplug the O2 sensor from the wiring harness above the downpipe.
Step 12: Loosen the 15mm bolts attaching the downpipe to the turbo– don’t separate the downpipe and the turbo yet!
Step 13: Remove the two 13mm nuts from the catalytic converter support under the car. Lift the studs out of the bracket, allowing the piping to move more freely.
Step 14: Fully remove the 15mm bolts attaching the downpipe to the turbo, separating them.
Step 15: Remove the top two 13mm bolts and nuts from the heatshield over the turbo.
Step 16: Remove the harmonic balancer on the engine mount with a 10mm socket, and pull it out so you can access the lowest bolt on the heatshield.
Step 17: This bolt is an 8mm; use a socket to remove it, allowing you to take the heatshield off.
Step 18: Remove the last two 13mm nuts from the bottom of the turbo, evenly and carefully supporting the turbo so it doesn’t drop. After this, you can remove the stock turbo from the engine.
That’s part 1 out of the way! Your stock turbo setup is now completely removed from the engine.
Step 19: Install the downpipe studs supplied with your kit onto your new turbo.
Step 20: Use an 8mm reverse torx socket and some threadlocker to re-install the stock turbo studs into the head until they are snug.
Step 21: Place the new gasket from your turbo kit over the studs, and slide the new turbo on over the replaced studs. The turbo can hang there while you grab your nuts.
Step 22: Support the turbo while evenly threading the nuts onto the studs using a 13mm socket. Lightly tighten these, securing the bottom two while leaving the top ones loose. The top two nuts will need to come back off to replace the heat shield. If you tighten them too hard now, they will come out with the top turbo studs when you remove them, meaning you’ll have to reseat the whole thing.
Step 23: Torque the bottom two nuts to 37 ft/lbs.
Step 24: Remove the top two nuts again so you can reinstall the heat shield, securing the nuts back over the heatshield at 37 ft/lbs.
Step 25: Tighten the lower 8mm heat shield bolt with an 8mm socket, and use a 10mm socket to retorque the harmonic balancer on the engine mount to 21 ft/lbs.
Step 26: Re-install the catalytic converter support with a 13mm socket. Align the downpipe on the new turbo studs, making sure the new exhaust gasket is sealed properly. Torque the downpipe nuts to 30 ft/lbs with a 15mm socket.
Step 27: Reconnect the O2 sensor to its plug, and torque the nuts on the catalytic converter support bracket to 18 ft/lbs.
Step 28: Reconnect the oil drain line to the bottom of the turbo– you will not be able to see it directly! Press the o-ring fitting back up into its hole until you feel it softly click. To protect the o-ring, it is best to douse it in motor oil so it can move smoothly. Carefully thread the 10mm bolt back into its threads, securing the oil drain line, being VERY careful not to strip the threads! Be patient, as it will take a few attempts.
Step 29: Smear a little oil on the o-ring for the oil feed line, and press the line back into its place. You will feel a subtle click when it is properly connected. Line up the flange, and attach the line with its 8mm bolt. Get it snug, but do not overtighten this bolt!
Step 30: Reconnect the coolant lines. The top line’s mounting tab must go OVER the bottom one. Make sure you feel them click as you press them into the turbo; if they do not click properly into place, they will leak a significant amount of coolant. Once they are aligned, replace the 8mm bolt, and tighten it until it is firm.
Step 31: Install the turbo inlet coupler. Your turbo kit comes with a silicone hose adapter that is compatible with the stock intake piping. Use the included hose clamps to secure the pipe.
Step 32: Reinstall the wastegate actuator lines. First, collect the old vacuum line left on the OEM turbo, and move it onto bottom of the new turbo, securing it with the spring clamp. Then, reattach the rubber line to the front of the wastegate, securing it with a spring clamp as well. Lastly, secure the rubber line to the inlet housing and secure it with its own spring clamp.
Step 33: Reconnect the intercooler piping. Start with the turbo-side coupler, attaching it to the turbo inlet with a hose clamp. Then, slide the piping into the coupler attached to the intercooler. Insert the top of the intercooler piping into the turbo-side coupler, and secure both sides with their respective hose clamps.
Step 34: Reattach the blowoff valve hose by pressing it back onto the valve’s flange.
Step 35: Connect the intake tube to the turbo side, followed by the airbox. Then, tighten the hose clamps on both sides.
Step 36: Reconnect the MAP sensor to the intake tube, pressing it into its clip.
Step 37: Reconnect the PCV quick release, firmly pressing it onto its connector until you feel it click.
Step 38: Reconnect the blowoff valve recirculation hose, tightening its spring clamp onto the intake tube.
Step 39: Check your fluids, and top off or replace as needed. Likely, you will have to replace a gallon or so of coolant (for the 2.3L Ecoboost Mustang, it is 50/50 orange Dexcool).
Step 40: Reconnect the battery with a 10mm socket.
Congratulations!
You have successfully installed your Turbonetics Precision Turbo kit! Head over to the Motoroso store to check out supporting modifications like intake and exhaust– and go get that thing tuned!